Teddy Bear Oatmeal Chocolate Chip Cookies
Published: November 25, 2025
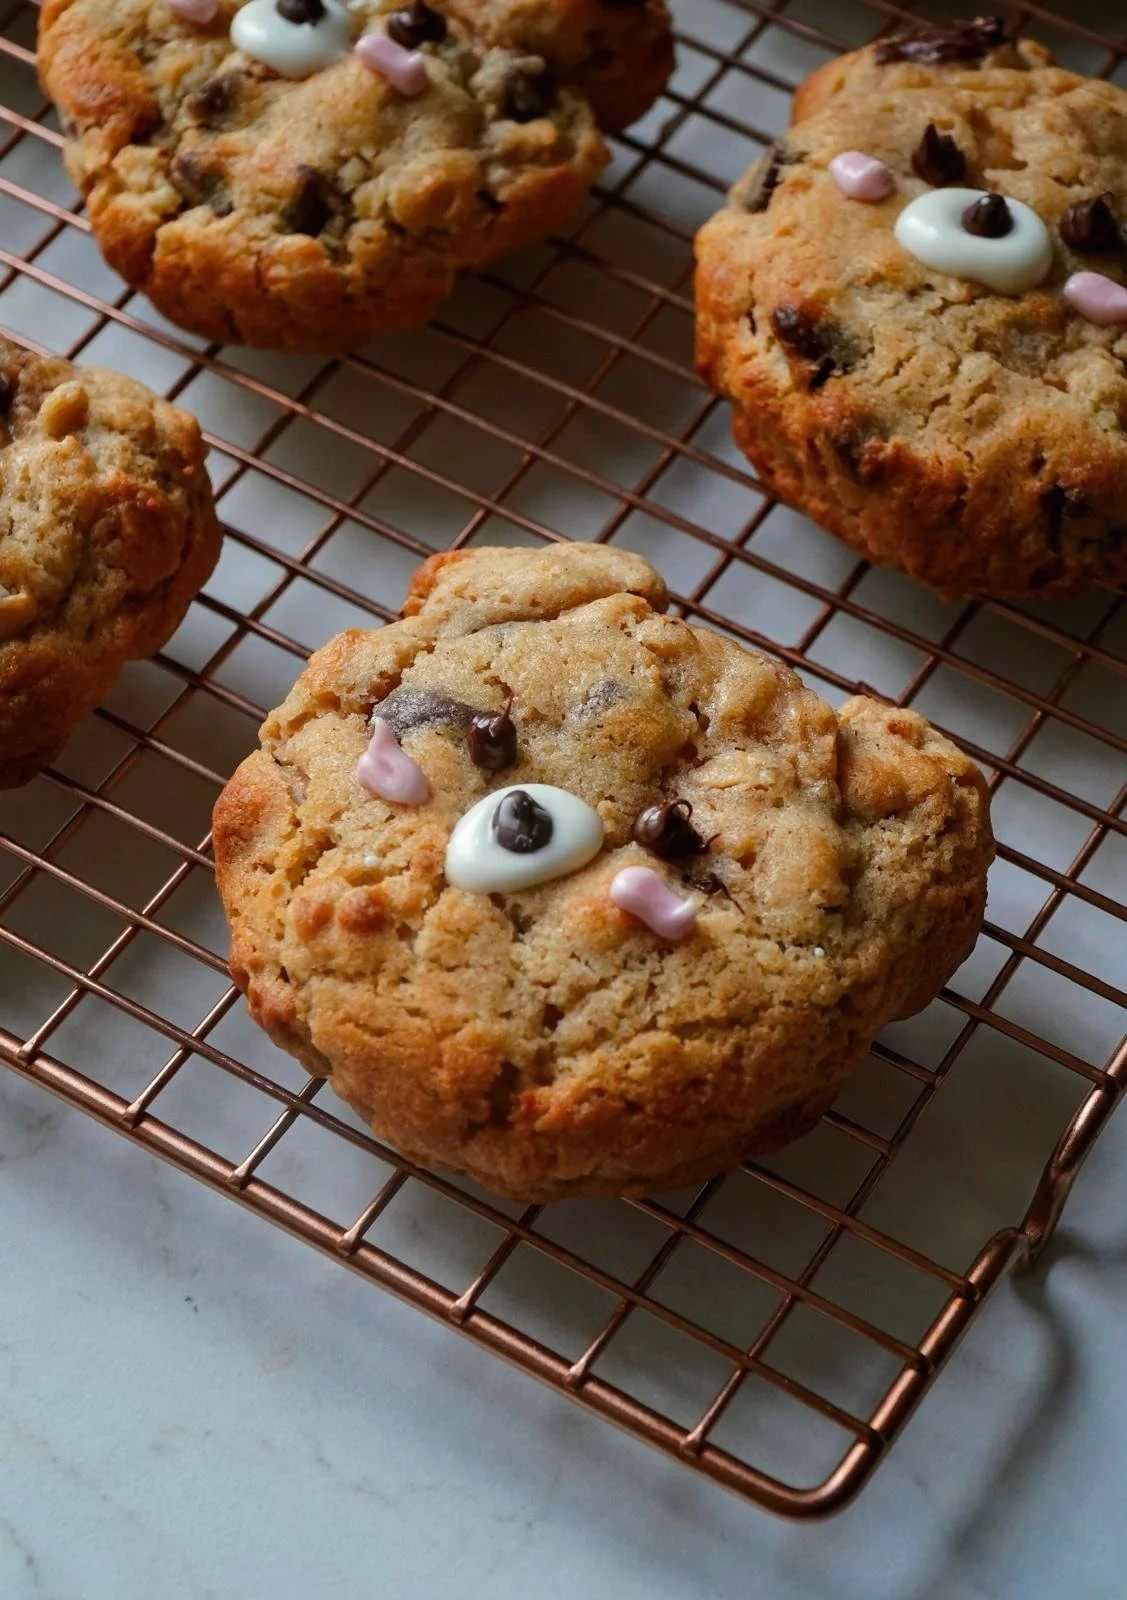
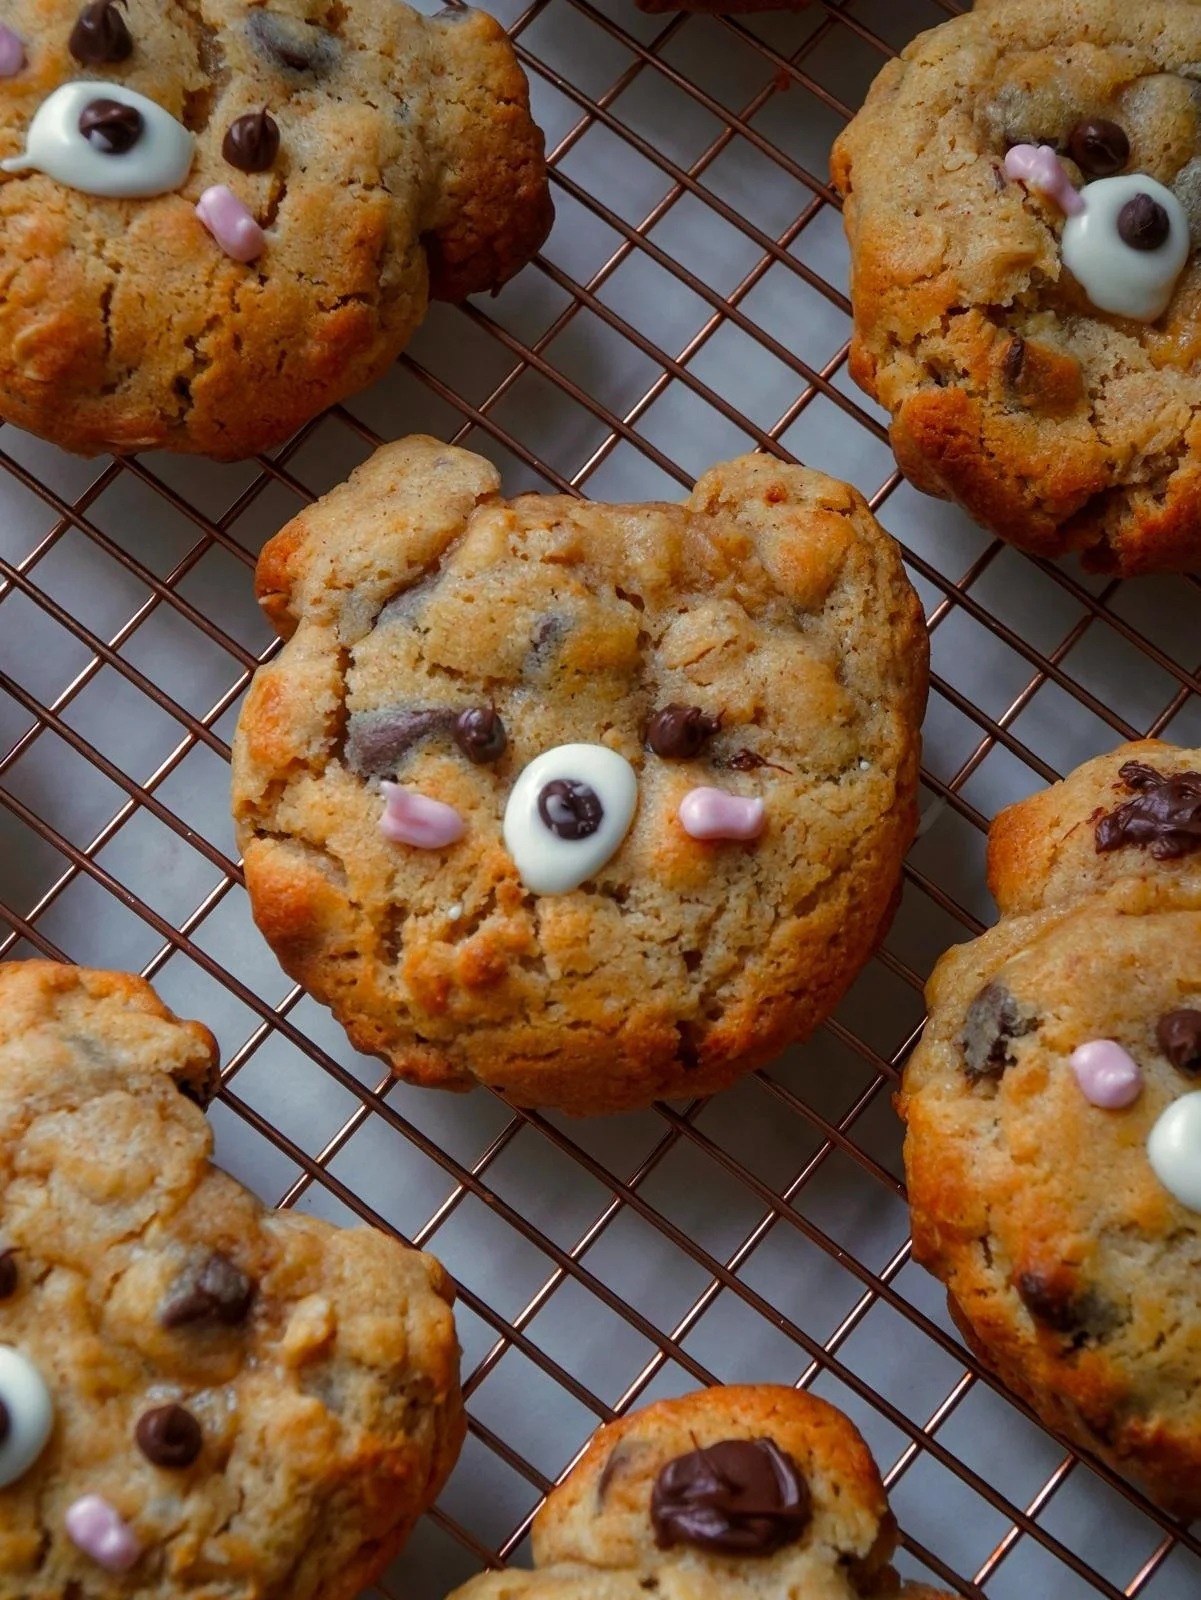
If you’re craving a cozy and cute dessert, these Teddy Bear Oatmeal Chocolate Chip Cookies are perfect. The cinnamon adds a subtle, warm flavor and the teddy shape makes them look extra sweet.
I kept seeing these cute Teddy Bear Cookies all over Pinterest and of course I had to try them. That’s why I love Pinterest, there’s so much inspo! I tested these about a month ago and first made a Vanilla Bean Sugar Cookie, but it didn’t hold its shape. Teddy cookies need more structure to stay recognizable, so they need a bit more flour and less butter than your usual soft cookie. That means they won’t be super thin and chewy, but they’re still soft in the middle with crisp edges.
One important tip: let them cool overnight if you can, that helps them keep their shape. I’ll give two shaping methods step by step below. Also: don’t be discouraged if some don’t look perfect straight out of the oven. Mine didn’t either. A little melted chocolate for the eyes and nose, and they instantly look like teddy bears. Trust me it works every time.
WHY YOU’LL LOVE THIS RECIPE
🤎 They’re adorable - the teddy bear shape makes them look extra fun and cute.
🤎 Soft and cozy - the inside stays soft while the edges get lightly crispy.
🤎 Warm cinnamon flavor - adds a subtle, cozy touch without overpowering the dough.
🤎 Fun to decorate - a little melted chocolate for the eyes and nose brings them to life.
🤎 Great for gifting - they’re the kind of cookies people instantly smile at.
🤎 Kid friendly - fun to make with kids or for kids’ parties.
🤎 Perfect for cozy seasons - they fit fall, winter, holidays… all the cozy vibes.

Tools you will need for this recipe
• Bowl - You’ll need a medium or large bowl to mix the cookie dough.
• Spatula - Great for folding in the dry ingredients and scraping down the sides of the bowl so nothing gets wasted.
• Hand whisk - Useful for mixing the wet ingredients together until smooth before adding the dry ingredients.
• Kitchen scale - Helps you measure everything accurately so the dough keeps its shape during baking. These cookies need precise amounts.
• Cookie scoop - Makes portioning the dough easier.
• Teaspoon - You’ll use this to form the small extra dough pieces for the ears.
• Small tray - You will need this for chilling the shaped dough. Keeping the shapes cold helps them stay structured in the oven.
• Large baking tray - This is where you’ll actually bake the cookies. Make sure it's big enough so the cookies have space to spread slightly.
• Parchment paper - Prevents sticking and makes it easier to lift the cookies off the tray.
• Piping bag - You’ll fill it with melted chocolate to “paint” the eyes and nose once the cookies cool.
CHECK OUT THESE PRODUCTS

Gold Whisk Buy Now → |

Pack of 3 Whisks for Cooking, Gold Metal Buy Now → |

Silicone Spatula Set Buy Now → |

Mik-Nana Food Scale Pink Buy Now → |

3Pcs Cookie Scoop Set, Stainless Steel Buy Now → |

1PCS 1tsp(1/3tbsp, 5 ml) Single Measuring Spoon Buy Now → |

Stainless Steel Measuring Spoons Set Buy Now → |

GoodCook Set of 2, Mini Baking Sheets Buy Now → |

NutriChef 3-Piece Nonstick Kitchen Oven Baking Pans Buy Now → |

Ateco Disposable Decorating Bags Buy Now → |

White Parchment Paper for Baking Buy Now → |

Baking Parchment Paper Buy Now → |
How to shape the Teddy Cookies
→ Method 1: Shape before freezing
Scoop your cookie dough into one larger ball (the head) and two tiny balls (the ears).
Gently press the ears onto the top of the head, just enough so they stick to the dough.
Place each assembled teddy head on a small tray lined with parchment paper.
Freeze the shaped cookies for 24 hours. This long chill helps the ears stay attached and keeps the shape from melting or spreading too much in the oven.
Bake straight from frozen.
→ Method 2: Shape right before baking
Scoop the dough into regular cookie balls (8 medium-large for the head and 16 teaspoons for the ears) and freeze them for 24 hours. No shaping yet.
When you're ready to bake, take one frozen dough ball and place it onto your baking tray this will be the head.
Place the ears above the head, leaving about 1 cm space between them and the head. As the cookie bakes, the dough will spread just enough for the ears to attach naturally.
Bake immediately while everything is still cold so they keep their teddy shape.
Frequently asked questions
1. How should I store the cookies?
Keep them in an airtight container at room temperature for up to 3 days. They stay soft and taste their best when stored in a cool, dry spot.
2. Can I freeze the cookies for longer storage?
Yes! Freeze them raw for up to 1 month.
3. Why did my cookies turn out cakey?
Cakey cookies usually mean too much flour or overmixing. Make sure to measure with a scale and stop mixing once everything is combined.
4. Why are my cookies tough or dry?
This often happens from overbaking or adding a little too much flour. Pull them out when the edges are set and the center is still soft.
5. Why didn’t my cookies keep the teddy shape?
They likely weren’t cold enough. These cookies need a full 24 hour freeze so the ears and head don’t spread too much. Also make sure the ears are firmly attached.
6. What did you use to “paint” the face details?
I used melted dark chocolate for the eyes. For the nose, I used melted white chocolate and pressed a dark chocolate chip in the center. For the blush, I mixed white chocolate with a drop of pink food coloring.
7. Can I make these as regular cookies (without the teddy shape)?
Absolutely! Skip the shaping and the 24 hour freeze. Just refrigerate the dough for 1 hour, then bake for about 12 minutes.
8. Do I have to use oats?
Yes. The oats help the cookies hold their shape. If you skip them, the dough may spread too much and the teddy face won’t hold.
9. Can I swap the chocolate chips?
Yes, use whatever you like: dark, milk, white chocolate, or mini chips. They all work great.
10. My dough feels too sticky. Is that normal?
A little sticky is fine, but if it’s very soft, chill it for 10-15 minutes before shaping for easier handling.
11. Can I use quick oats instead of rolled oats?
Yes, but rolled oats give more texture. Quick oats will make the cookies slightly softer.
12. Why did my ears fall off in the oven?
Either they weren’t pressed on firmly enough, or the dough wasn’t cold enough. Make sure the cookies are frozen solid before baking.
Ingredients you will need for this recipe
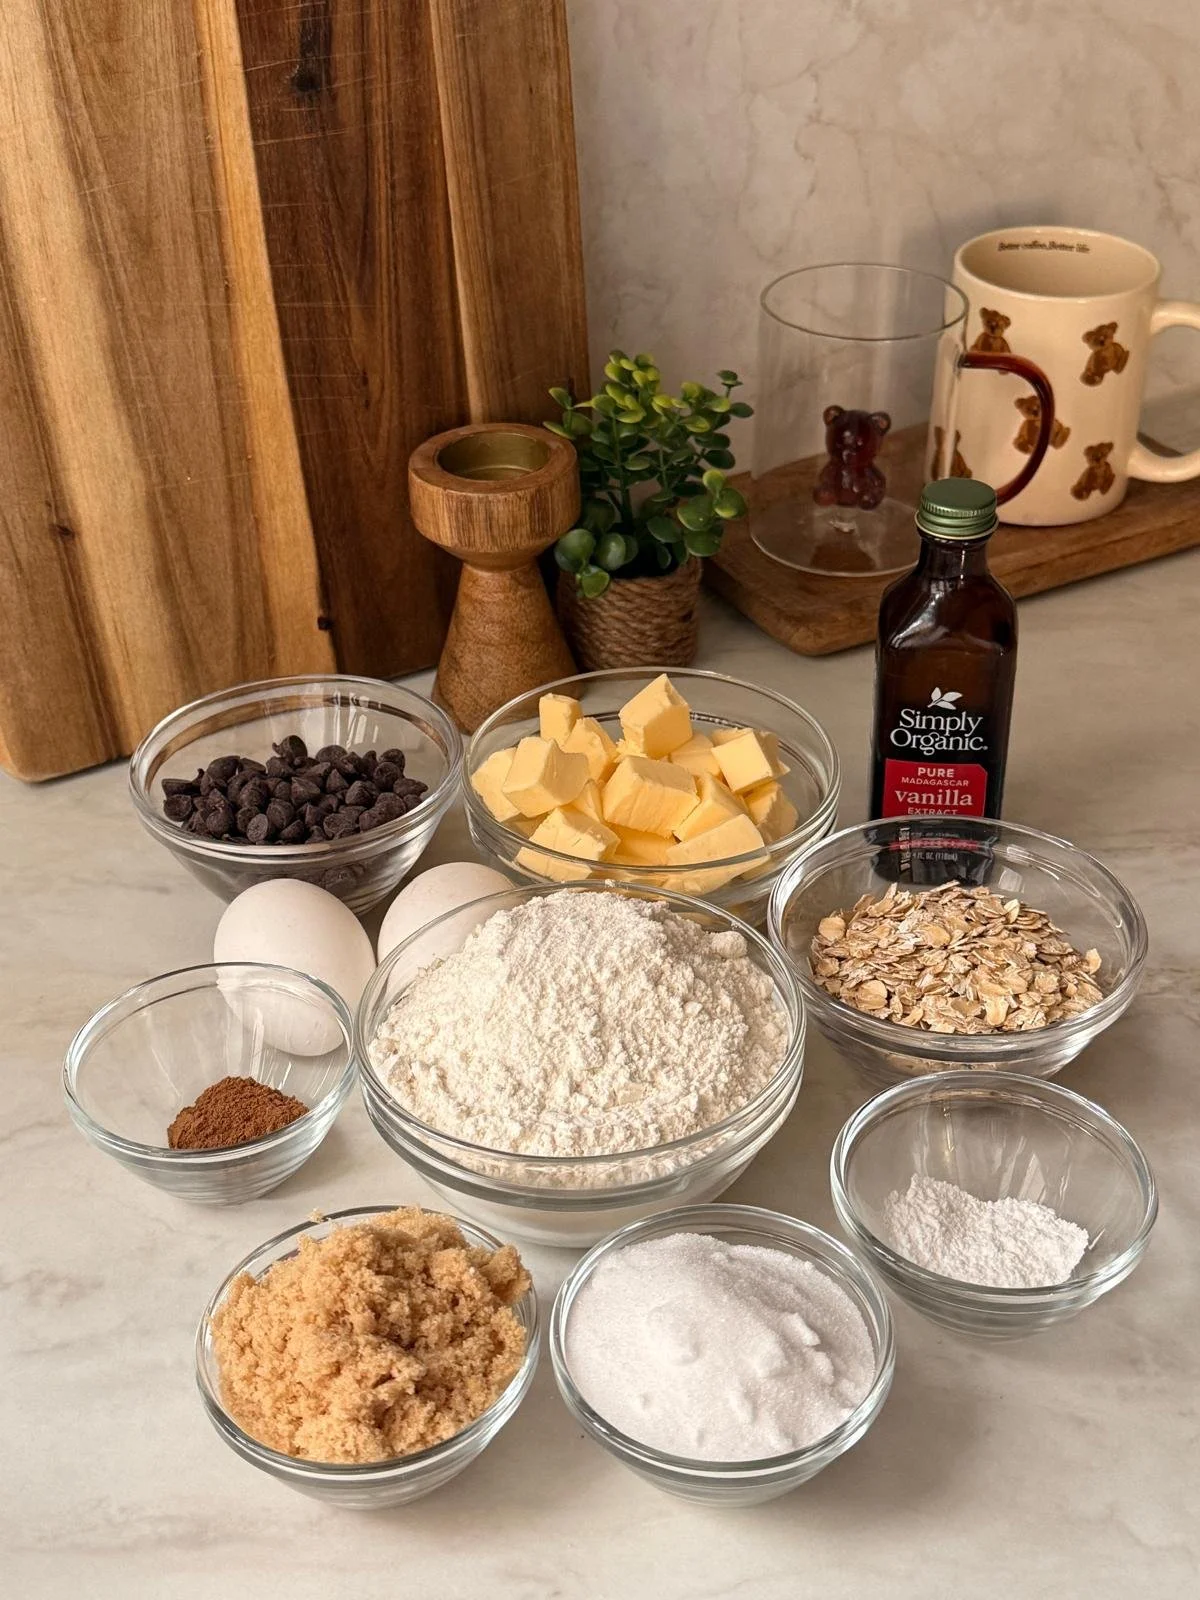
Butter: Make sure you’re using unsalted butter for this recipe. Also, if you keep your butter in the fridge, let it come to room temperature before using or pop it in the microwave for 20-30 seconds.
Granulated sugar: This adds sweetness and keeps the edges crisp.
Light brown sugar: Dark brown sugar works as a substitute.
One egg + one egg yolk: The whole egg binds the dough and the extra yolk makes the cookies richer and softer in the center. You will need large eggs for this recipe.
Vanilla extract: You can use vanilla bean paste instead.
All purpose flour: Gives the cookies structure so they hold their teddy shape.
Old fashioned oats: These give texture and also help them hold their shape.
Baking powder: Helps the cookies rise a little so they’re not too dense.
Cinnamon: Adds a cozy, warm flavor that pairs perfectly with the oats and chocolate.
Chocolate chips (milk or dark): These make the cookies chocolatey.
Step by step instructions with photos
1. Prepare the cookie dough.
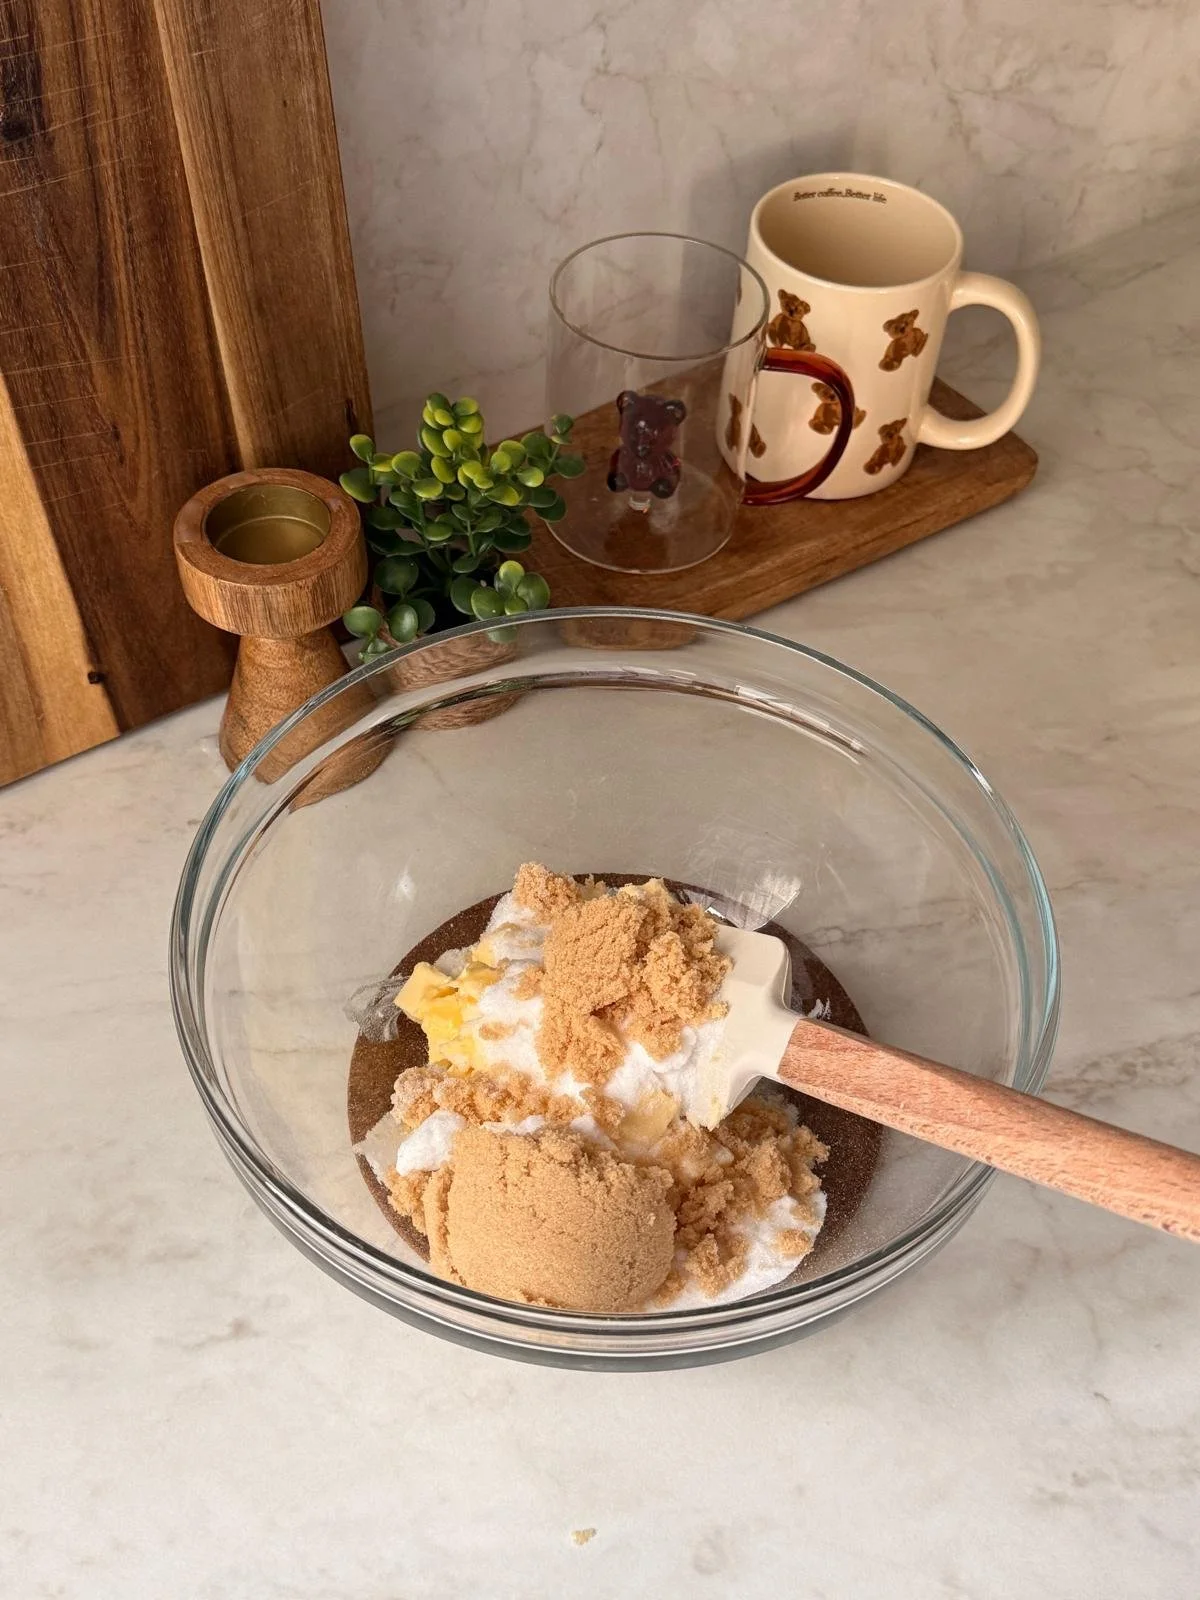
2. In a large bowl mix the softened butter with the granulated sugar and light brown sugar until smooth.
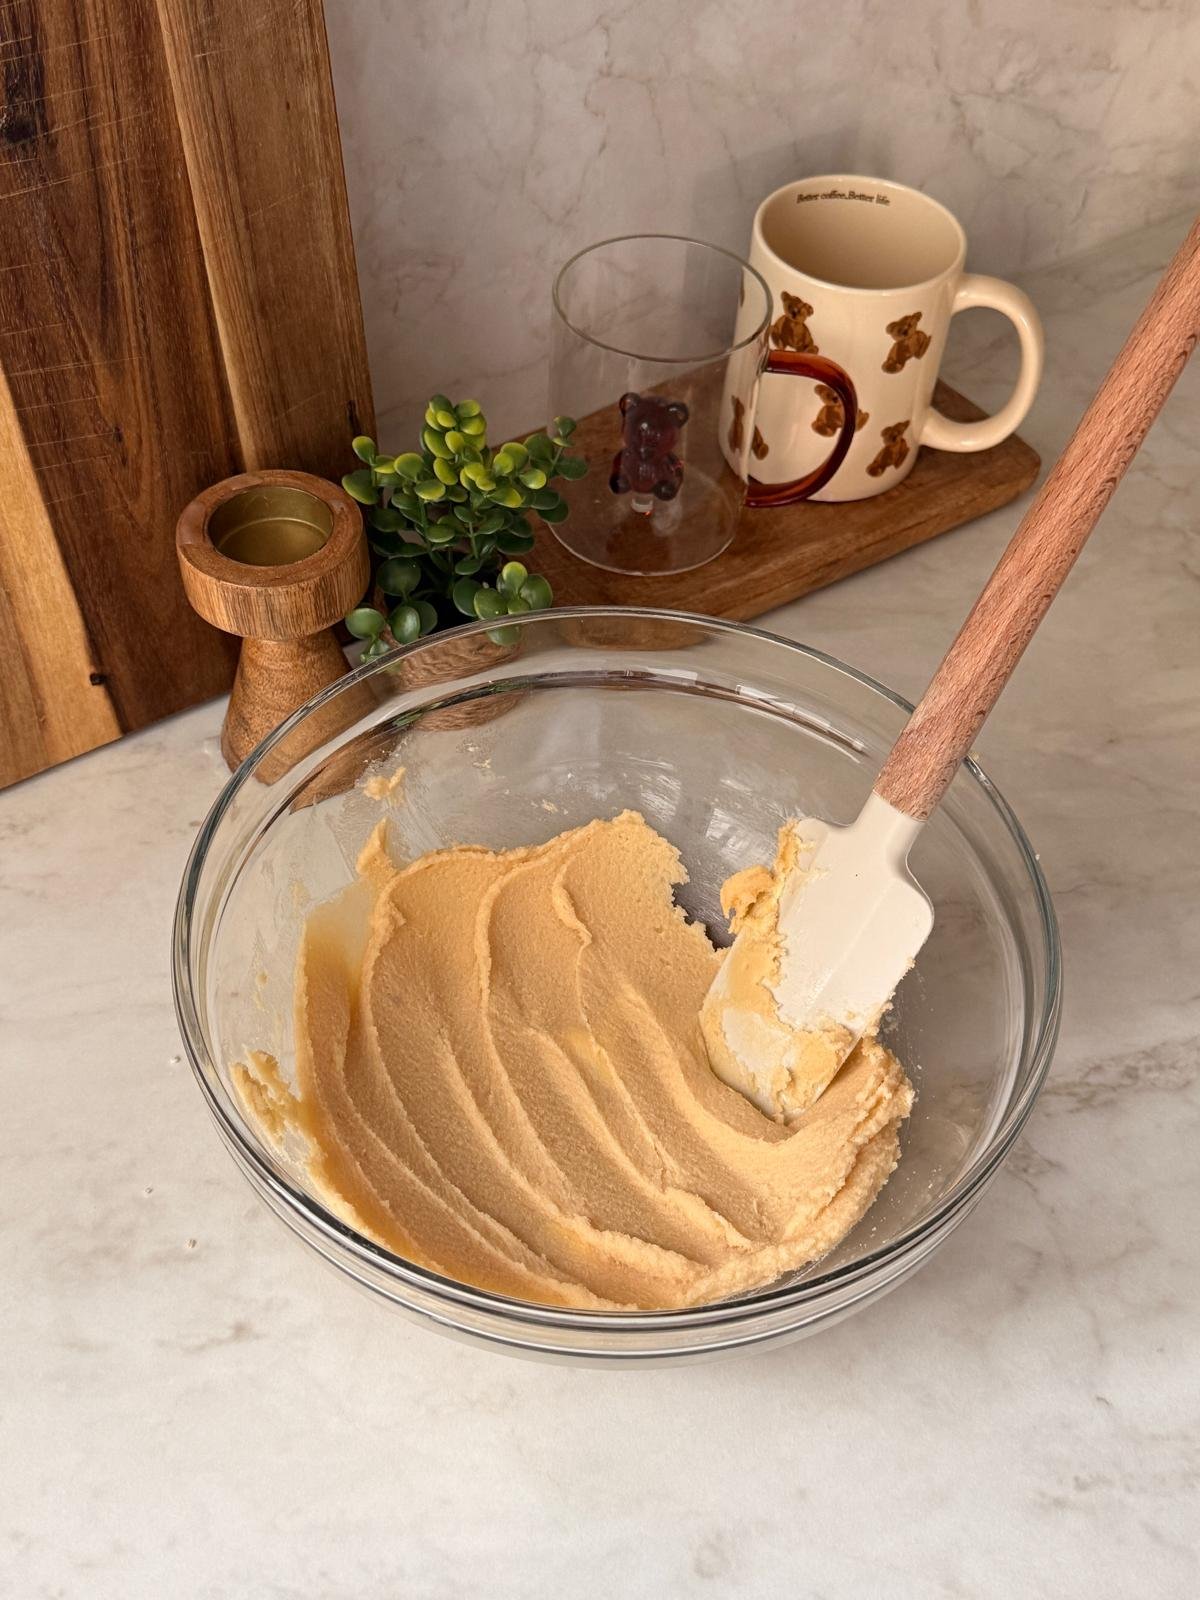
3. Mix in the egg, egg yolk and vanilla until fully combined.


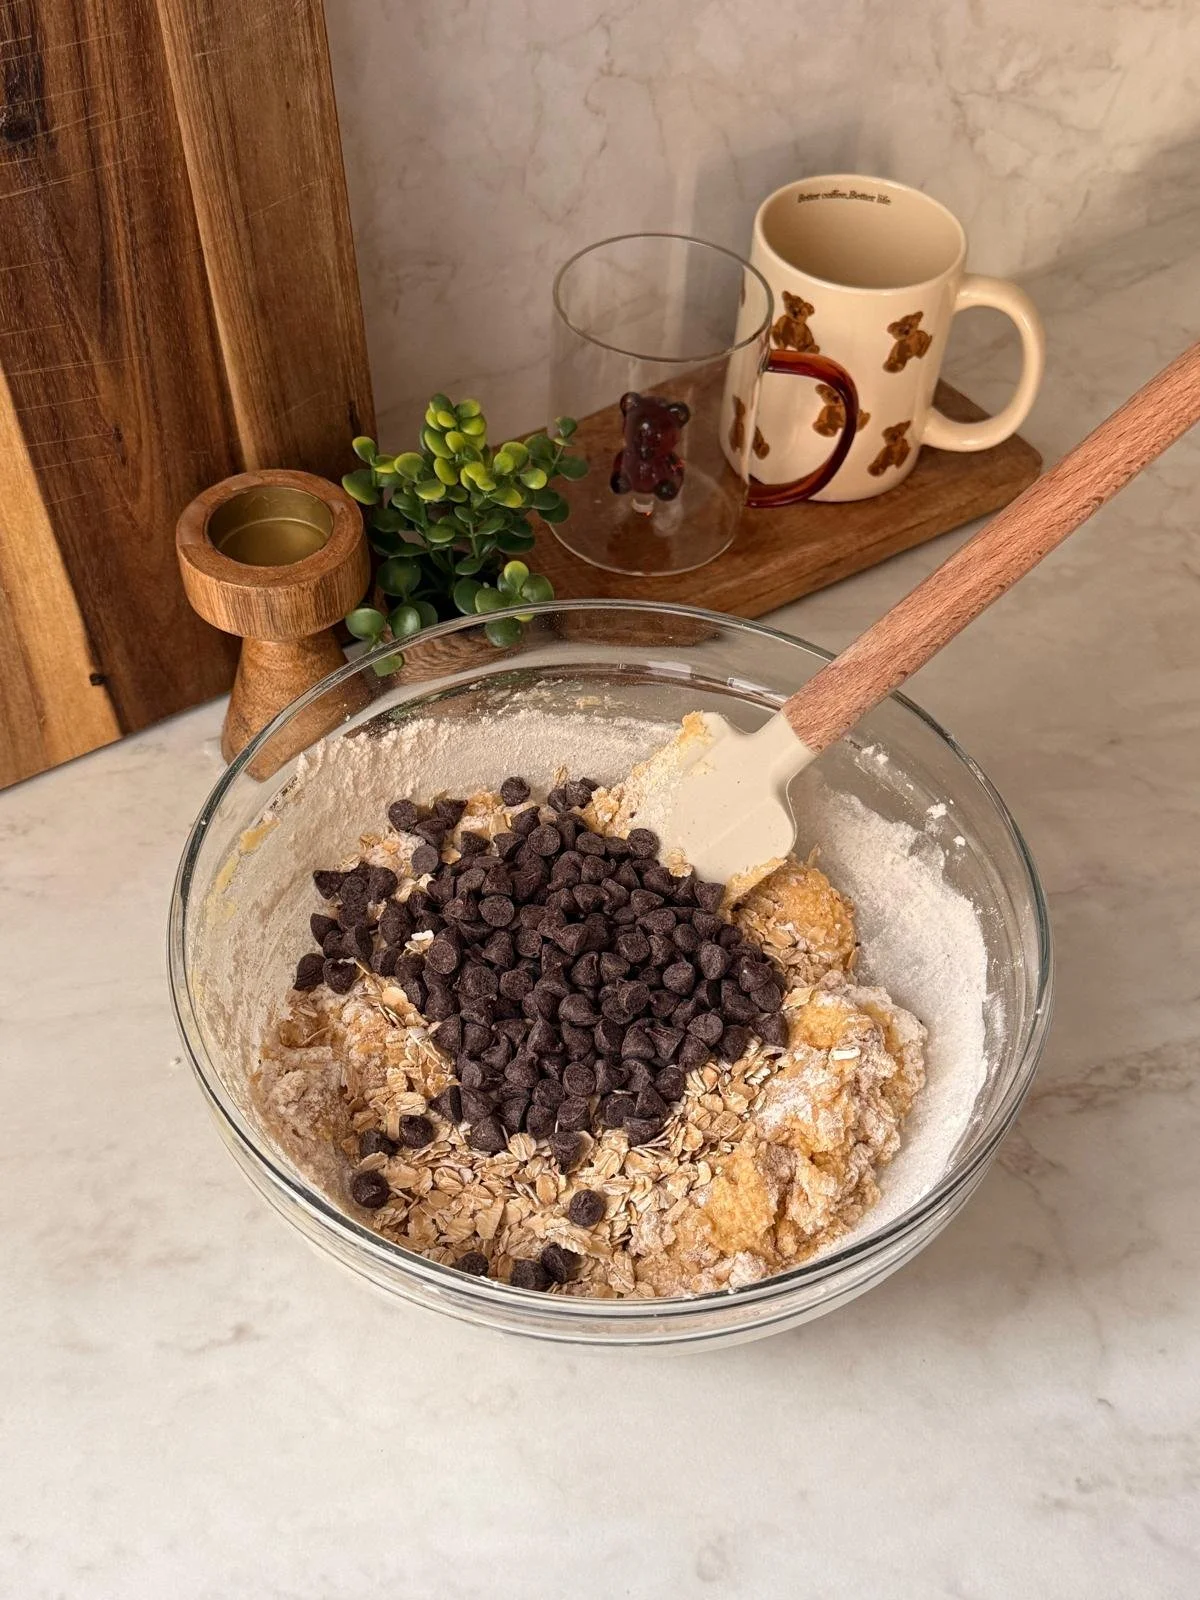
4. Fold in the flour, baking powder and cinnamon until just combined. Do not overmix.


5. Then fold in the chocolate chips and oats.

6. Line a small tray with parchment paper.
7. Scoop out 8 cookies (I used a 5.5 cm cookie scoop) and 16 teaspoons of dough for the ears.

8. ***Method 1: Freeze the scooped dough overnight on a tray and assemble the cookies just before baking. Instead of attaching the ears to the face, place the pieces directly on the baking tray. Arrange the face on the tray, then position the ears above it, leaving a 1 cm gap.
9. ***Method 2: Right after scooping, take each cookie, roll it into a ball and attach two small dough pieces on top for the ears. Press gently so they stick. (I USED THIS METHOD)


10. Must freeze overnight!!
11. Preheat the oven to 180°C.
12. Place the frozen cookies on a large tray lined with parchment paper, leaving space between them.

13. Bake in the preheated oven for 13-15 minutes.

14. Let them cool completely, then pipe the teddy’s eyes and nose with melted chocolate.
15. Enjoy


Teddy Bear Oatmeal Chocolate Chip Cookies
If you’re craving a cozy and cute dessert, these Teddy Bear Oatmeal Chocolate Chip Cookies are perfect. The cinnamon adds a subtle, warm flavor and the teddy shape makes them look extra sweet.
Ingredients
- 130g unsalted butter, softened - 1/2 cup + 1 tablespoon
- 80g granulated sugar - 1/3 cup + 1 tablespoon
- 80g light brown sugar - 1/3 cup + 1 teaspoon
- 1 large egg + 1 egg yolk
- 1 teaspoon vanilla extract
- 200g all purpose flour - 1 cup + 1/2 cup + 1 tablespoon
- 50g old fashioned oats - 2/3 cup
- 4g baking powder - 1 teaspoon
- 1 teaspoon cinnamon
- 100g chocolate chips (milk or dark) - 2/3 cup
Instructions
- Prepare the cookie dough.
- In a large bowl mix the softened butter with the granulated sugar and light brown sugar until smooth.
- Mix in the egg, egg yolk and vanilla until fully combined.
- Fold in the flour, baking powder and cinnamon until just combined. Do not overmix.
- Then fold in the chocolate chips and oats.
- Line a small tray with parchment paper.
- Scoop out 8 cookies (I used a 5.5 cm cookie scoop) and 16 teaspoons of dough for the ears.
- ***Method 1: Freeze the scooped dough overnight on a tray and assemble the cookies just before baking. Instead of attaching the ears to the face, place the pieces directly on the baking tray. Arrange the face on the tray, then position the ears above it, leaving a 1 cm gap.
- ***Method 2: Right after scooping, take each cookie, roll it into a ball and attach two small dough pieces on top for the ears. Press gently so they stick.
- Must freeze overnight!!
- Preheat the oven to 180°C.
- Place the frozen cookies on a large tray lined with parchment paper, leaving space between them.
- Bake in the preheated oven for 13-15 minutes.
- Let them cool completely, then pipe the teddy’s eyes and nose with melted chocolate.
- Enjoy
Nutrition Facts
Calories
341Fat
28 gSat. Fat
11 gCarbs
42 gFiber
1 gNet Carbs
50 gSugar
17 gProtein
4 gSodium
60 mgCholesterol
58 mg